Javascript – Loop promises one by one with a sleep in between

//Async task

let asyncTask = (input) => {

  //Below is a sample

  returnnewPromise((resolve, reject) => {

    console.log('Task no: '+input)

    resolve();

  })

};


//Loop function that throttles async tasks - one by one and with an sleep interval.

let loop = (count, oncompletion) => {

  //Execute main code and recurse if count > 0

  asyncTask(count).then(

    resonse=> {

    count--

    if(count) {

      setTimeout( ()=>loop(count), loopInterval );

    } else

      onCompletion();

  },

  error=> {

    console.log('Some error happend.');

  });

};


//This function is called back after looping through all async tasks.

let onCompletion = () => {

  console.log('Completed');

}


//Run the loop

let loopCount = 5;

let loopInterval = 1000;

loop(loopCount, loopInterval, onCompletion);

Enabling JWT authentication for plugin routes in HapiJS APIs

If you are using securing your HapiJS APIs using JWT, below is the code snippet most tutorials suggest:

server.register([
	{ register: require('hapi-auth-jwt') },
	{ register: require('./routes/test-route') }
	], 
	(err) => {
            if (err) {
              console.error('Failed to load a plugin:', err);
            } else {
			//For JWT 
			server.auth.strategy('token', 'jwt', {
				key: new Buffer(process.env.AUTH_CLIENT_SECRET,'base64'),
				verifyOptions: {
					algorithms:['HS256'],
					audience: process.env.AUTH_CLIENT_ID
				}
			});

			//For testing
			server.route({
				method: 'GET',
				path: '/',
				config: { auth: 'token' },
				handler: function (request, reply) {
					reply('API server running happi and secure!');
				}
			});
            }
        }
);

//Server start
server.start((err) => {
	if (err) {
		throw err;
	}
	console.log(`Server running at: ${server.info.uri}`);
});

In the “GET /” route, the config, auth: ‘token’ specifies that the token JWT auth strategy should be applied.
However, a problem might arise, when you want to include a route from a plugin – lets say a “GET /test” route needs to be added from ./routes/test-route.js.
In the test-route.js, when I added config: {auth: ‘token’} under “GET /test”, Hapi complains “Error: Unknown authentication strategy token in /test. This is because the auth strategy “token” is defined externally in server.js (if that’s your entry point).

The solution is to specify server.auth.default(‘token’); in your entry point or server.js. With this configuration, we don’t need to specify config : {auth: ‘token’} under each route. If we want to exclude a route from authenticating, we can specify config: {auth: false} under that route.

The solution looks like this:

server.register([
	{ register: require('hapi-auth-jwt') },
	{ register: require('./routes/test-route') }
	], 
	(err) => {
            if (err) {
              console.error('Failed to load a plugin:', err);
            } else {
			//For JWT 
			server.auth.strategy('token', 'jwt', {
				key: new Buffer(process.env.AUTH_CLIENT_SECRET,'base64'),
				verifyOptions: {
					algorithms:['HS256'],
					audience: process.env.AUTH_CLIENT_ID
				}
			});

			//This enables auth for routes under plugins too.
			server.auth.default('token');

			//For testing - auth included by default
			server.route({
				method: 'GET',
				path: '/',
				handler: function (request, reply) {
					reply('API server running hapi and secure!');
				}
			});

			//For testing - auth excluded through config
			server.route({
				method: 'GET',
				path: '/',
				config: { auth: false },
				handler: function (request, reply) {
					reply('API server running hapi!');
				}
			});
            }
        }
);

//Server start
server.start((err) => {
	if (err) {
		throw err;
	}
	console.log(`Server running at: ${server.info.uri}`);
});

Ionic 2, AngularFire 2 and Firebase 3

  1. Create a new Ionic 2 project:
    ionic start example-ionic blank --v2
  2. Install Firebase 3 and AngularFire 2
    cd example-ionic
    npm install angularfire2 firebase —save
    typings install file:node_modules/angularfire2/firebase3.d.ts --save --global
  3. In app.ts
    import {Component} from '@angular/core';
    import {Platform, ionicBootstrap} from 'ionic-angular';
    import {StatusBar} from 'ionic-native';
    import {HomePage} from './pages/home/home';
    
    import {
     defaultFirebase,
     FIREBASE_PROVIDERS
    } from 'angularfire2';
    
    const COMMON_CONFIG = {
     apiKey: "YOUR_API_KEY",
     authDomain: "YOUR_FIREBASE.firebaseapp.com",
     databaseURL: "https://YOUR_FIREBASE.firebaseio.com",
     storageBucket: "YOUR_FIREBASE.appspot.com"
    };
    
    @Component({
     template: '<ion-nav [root]="rootPage"></ion-nav>',
     providers: [
     FIREBASE_PROVIDERS,
     defaultFirebase(COMMON_CONFIG)
     ]
    })
    export class MyApp {
     rootPage: any = HomePage;
    
     constructor(platform: Platform) {
     platform.ready().then(() => {
     // Okay, so the platform is ready and our plugins are available.
     // Here you can do any higher level native things you might need.
     StatusBar.styleDefault();
     });
     }
    }
    
    ionicBootstrap(MyApp);
  4. In home.ts
    import {Component} from '@angular/core';
    import {NavController} from 'ionic-angular';
    
    import {
     AngularFire,
     FirebaseObjectObservable
    } from 'angularfire2';
    
    @Component({
     templateUrl: 'build/pages/home/home.html'
    })
    export class HomePage {
     item: FirebaseObjectObservable<any>;
    
     constructor(private navCtrl: NavController, af: AngularFire) {
     this.item = af.database.object('/item');
     }
    }
  5. In home.html
    <ion-header>
     <ion-navbar>
     <ion-title>
     Ionic Blank
     </ion-title>
     </ion-navbar>
    </ion-header>
    
    <ion-content padding>
     The world is your oyster.
     <p>
     {{ (item | async)?.name }}
     </p>
    </ion-content>
  6. In your firebase console, make sure have an object under /item with a “name” property. This is what we load in our example code above.
  7. Test by running the app.
    ionic serve

Become DevOps overnight: Continuous deployment for your scalable cloud app.

Some of the things we hate to spend time while development are setting up environments, building and deploying stuff. But good news is nowadays there are plenty of tools to solve this. In this post I would like to share a very quick way of becoming a DevOps overnight and automating all the boring part of getting your product running seamlessly as you develop.

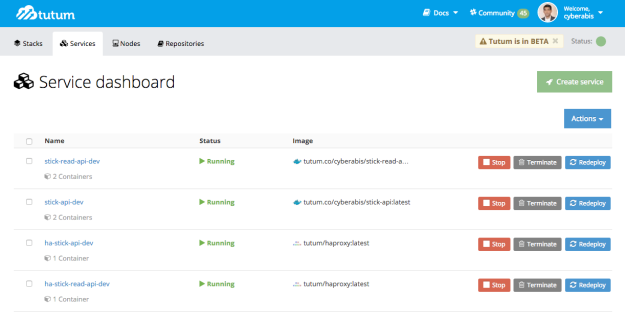
Snapshot of my Tutum Services after setting up continuous deployment

#1. Iaas, Paas, Saas and tech stack decisions

At the start of our project we had to decide how our tech stack is going to be – our philosophy was to use Iaas for any stateless process or jobs like API servers or event processors. For persistence alone we decided to go with Saas solutions. We picked up NodeJS for APIs and Java / Python for daemon processes. Being part of Microsoft Bizspark, we run all these processes on Azure Linux instances. For temporary persistence, we found AWS pretty good performance or price wise and picked up Kinesis + DynamoDB. S3 was chosen for long term storage. The strategy was to be able to easily swap across cloud service providers at any point in future with almost no tight coupling with any vendor.

#2. Local development

Local development has to be as fast as possible – personally I find using docker in my early stages of development slows me down and also messes up my local machine with chunky images. So on my local machine I prefer to stick to run my apps in the standard way without any containerization.

#3. Dockerization

Docker is simply awesome when it comes to deploying programs to cloud instances. I can also easily horizontal scale test, load balance test with just multiple docker container instances on a single node. All that’s needed is to add a simple Dockerfile in every project directory. A NodeJS example is shown below.

FROM node:0.12

# Bundle app source
ADD . /src
# Install app dependencies
RUN cd /src; npm install

EXPOSE 3000
CMD ["node", "/src/app.js"]

#4. Continuous deployment with Tutum

Tutum is still in Beta, but it’s awesome and free (atleast for now)! The first step in setting up Tutum is to go to Account Info and add Cloud Providers and Source Providers – in our case it’s Microsoft Azure and GitHub. Tutum has a very clear definition of the components required for setting up a continuous deployment:

a. Repository – Here we create a new (private) repository in Tutum and link to our GitHub to sync on every update. The source code gets pulled from GitHub and docker images are built inside Tutum’s repository with every GitHub update.

b. Node – We can create Azure instances right from Tutum. You have to set up Tutum to be able to get access to Azure. Each instance is a Node in Tutum.

c. Services – A service is a process or a program that you run. Services can comprise of one or more docker containers depending upon if we scale or not. Services can be deployed on one or more nodes to horizontally scale.

While creating Nodes and Services, Tutum allows to specify tags like “dev”, “prod”, “front-end”, “back-end”. The tags determine on what nodes a service gets deployed. Thus we can have separate nodes for “front-end dev”, another for “font-end prod” etc.

Tutum is not super fast yet – I believe it’s mainly due to the time taken to build docker images. But still decent enough. For continuous deployment, we have to specify “Autodeploy” option while creating the service. Another good feature I found with Tutum is that there are jumpstart services like HA load balancer – it really makes setting up a high availability API cluster a breeze.

#5. Slack Integration

Like so many other startups we are quite excited about Slack. I have seen Slack integration with other Continuous Integration products like Circle CI and was surprised to see even Tutum Beta had that. I created a new channel in our Slack and from Integration settings enabled Incoming Webook – this gives an URL I have to paste in Tutum > Account Info > Notifications > Slack. And that’s it, we have a continuous deployment ready with all the bells and whistles.

Like I mentioned at the start there are multiple options to automate build, test and deployment. This post suggests a very economic yet scalable solution using Tutum – and literally I was able to learn and get everything running overnight!

Azure Service Bus Topic issue while using NodeJS SDK: Error: getaddrinfo ENOTFOUND

While using NodeJS SDK to send message to an Azure Service Bus Topic, the docs suggest to set a couple of environment variables: AZURE_SERVICEBUS_NAMESPACE and AZURE_SERVICEBUS_ACCESS_KEY. However this did not work for me with SDK 0.10.6 and sendTopicMessage method returned error message “Error: getaddrinfo ENOTFOUND”.

To solve this, instead of setting the environment variable, create the service bus service like below – replace <namespace> and <namespace_access_key> accordingly.

azure.createServiceBusService('Endpoint=sb://'+ <namespace> + '.servicebus.windows.net/;SharedAccessKeyName=RootManageSharedAccessKey;SharedAccessKey=' + <namespace_access_key>);

Google Polymer: gulp serve error

Being eager to tryout Polymer 1.0, I downloaded the Polymer Started Kit and ran gulp serve only to run into below error:

[14:42:29] 'elements' all files 0 B
[14:42:29] Finished 'elements' after 2.18 s
Unhandled rejection Error: spawn ENOENT
    at errnoException (child_process.js:1001:11)
    at Process.ChildProcess._handle.onexit (child_process.js:792:34)
[14:42:29] 'styles' all files 98 B
[14:42:29] Finished 'styles' after 3.1 s

This happens when gulp serve task throws and error and it’s not handled. From the error log I could see that the “sytles” and “elements” sub tasks have completed. The other sub task for “serve” task is “images”. In gulpfile.js, the images task was configured as:

// Optimize Images
gulp.task('images', function () {
 return gulp.src('app/images/**/*')
 .pipe($.cache($.imagemin({
 progressive: true,
 interlaced: true
 })))
 .pipe(gulp.dest('dist/images'))
 .pipe($.size({title: 'images'}));
});

I changed this to:

// Optimize Images
gulp.task('images', function () {
 return gulp.src('app/images/**/*')
 .pipe($.cache($.imagemin({
 progressive: true,
 interlaced: true
 }))).on('error', errorHandler)
 .pipe(gulp.dest('dist/images'))
 .pipe($.size({title: 'images'}));
});

And added below error handler function to the bottom of gulpfile.js:

// Handle the error
function errorHandler (error) {
 console.log(error.toString());
 this.emit('end');
}

#microtip – Center a div horizontally and vertically

A small tip that can be handy say when you are creating a landing HTML page. The goal is to position or align a div in the centre of the browser. There are many misleading and non working example when you google this, so pasting a simple solution that works.

HTML

<div class="outer-container">
 <div class="inner-container">
 <center>
 <h3>Hello Center!</h3>
 </center>
 </div>
</div>

CSS

.outer-container {
 position: fixed;
 top: 0;
 left: 0;
 width: 100%;
 height: 100%;
}

.inner-container {
 position: relative;
 top: 40%;
}

JsFiddle: http://jsfiddle.net/31L9jdsz/

CORS for play framework 2.3.x java app

CORS is Cross Origin Resource Sharing and allows a browser to access APIs from a different domain. CORS is better than JSONP as it can be applied to Http POST, PUT, DELETE etc. Also using CORS is simpler as there is no special set up required in jQuery UI layer.

Configuring CORS for Play 2.3 java app is different from older versions. The following needs to be done:

1. All API responses from the server should contain a header: “Access-Control-Allow-Origin”, “*”. We need to write a wrapper for all action responses.

2. Server requests like POST, PUT make a preflight request to the server before the main request. The response for these preflight requests should contain below headers:

“Access-Control-Allow-Origin”, “*”
“Allow”, “*”
“Access-Control-Allow-Methods”, “POST, GET, PUT, DELETE, OPTIONS”
“Access-Control-Allow-Headers”, “Origin, X-Requested-With, Content-Type, Accept, Referer, User-Agent”

For achieving #1, do the following in Play: If you don’t already have a Global.java, create one in your default package.

play.*;
import play.libs.F.Promise;
import play.mvc.Action;
import play.mvc.Http;
import play.mvc.Result;

public class Global extends GlobalSettings {

 // For CORS
 private class ActionWrapper extends Action.Simple {
 public ActionWrapper(Action<?> action) {
 this.delegate = action;
 }

 @Override
 public Promise<Result> call(Http.Context ctx) throws java.lang.Throwable {
 Promise<Result> result = this.delegate.call(ctx);
 Http.Response response = ctx.response();
 response.setHeader("Access-Control-Allow-Origin", "*");
 return result;
 }
 }

 @Override
 public Action<?> onRequest(Http.Request request,
 java.lang.reflect.Method actionMethod) {
 return new ActionWrapper(super.onRequest(request, actionMethod));
 }

}

For #2, First make an entry in routes. A preflight request is of Http type OPTIONS. So make an entry like below.

OPTIONS /*all controllers.Application.preflight(all)

Next, define the preflight method in your Application controller. And CORS is all setup!

package controllers;

import play.mvc.*;

public class Application extends Controller {

 public static Result preflight(String all) {
 response().setHeader("Access-Control-Allow-Origin", "*");
 response().setHeader("Allow", "*");
 response().setHeader("Access-Control-Allow-Methods", "POST, GET, PUT, DELETE, OPTIONS");
 response().setHeader("Access-Control-Allow-Headers", "Origin, X-Requested-With, Content-Type, Accept, Referer, User-Agent");
 return ok();
 }

}

Back to learning Grammar with ANTLR

This post is going to be about language processing. Language processing could be anything like an arithmetic expression evaluator, a SQL parser or even a compiler or interpreter. Many times when we build user facing products, we give users a new language to interact with the product. Say, if you had used JIRA for project management, it gives you a Jira Query Language. Google also has a language to search as documented here – https://support.google.com/websearch/answer/136861?hl=en. Splunk has it’s own language called SPL. How to build such a system is what we will see in this post.

A test use case

I always believe to learn something we need to have a problem to solve that can serve as a use case. Let’s say I want to come up with a new language that’s simpler than SQL. Say I want the user to be able to key in the below text:

Abishek AND (country=India OR city=NY) LOGIN 404 | show name city

And this should fetch name and city fields from a table where the text matches “Abishek” and Abishek could be either in some city in India or gone to New York. We also need to filter results that contain the text LOGIN and 404 as we are trying to trace what happened when Abishek was trying to login but landed with some error codes. Say the data is in a database, what we need here is a language parser to understand the input and then a translator that can translate to SQL so that we can run the query on DB.

What is ANTLR?

From antler.org, ANTLR (ANother Tool for Language Recognition) is a powerful parser generator for reading, processing, executing, or translating structured text or binary files. And ANTLR can greatly help solve our use case pretty quickly. There are few more similar tools like javacc etc, but I found ANTLR to the well documented and top project in this space.

The first step: Grammar

When we want a parser, an approach many take is to go and write the parser from scratch. I remember doing so in an interview where I was asked to write an arithmetic expression evaluator. Though this approach works – it’s not the best choice when you have complex operators, keywords and many choices. Choices are an interesting thing – If you know Scala you will realise 5 + 3 is the same as 5.+(3). Usually there is more than one way to do things, in our example we could either say “LOGIN AND 404” or just say “LOGIN 404”. Grammar involves identifying these choices, sequences and tokens.

ANTLR uses a variant of the popular LL(*) parsing technique (http://en.wikipedia.org/wiki/LL_parser) which takes a top down approach. So we define the grammar from top down – fist look at what the input is – Say a file input can have a set of statements – statements can be classified into different statement types based on identifying patterns and tokens. Then statements can be broken down in different types of expressions and expressions can contain operators and operands.

In this approach a quick grammar I came up for our use case is like below:

grammar Simpleql;

statement : expr command* ; 
expr : expr ('AND' | 'OR' | 'NOT') expr # expopexp
 | expr expr # expexp
 | predicate # predicexpr
 | text # textexpr
 | '(' expr ')' # exprgroup
 ;
predicate : text ('=' | '!=' | '>=' | '<=' | '>' | '<') text ; 
command : '| show' text* # showcmd
 | '| show' text (',' text)* # showcsv
 ;
text : NUMBER # numbertxt 
 | QTEXT # quotedtxt
 | UQTEXT # unquotedtxt
 ;

AND : 'AND' ;
OR : 'OR' ;
NOT : 'NOT' ;
EQUALS : '=' ;
NOTEQUALS : '!=' ;
GREQUALS : '>=' ;
LSEQUALS : '<=' ;
GREATERTHAN : '>' ;
LESSTHAN : '<' ;

NUMBER : DIGIT+
 | DIGIT+ '.' DIGIT+
 | '.' DIGIT+
 ;
QTEXT : '"' (ESC|.)*? '"' ;
UQTEXT : ~[ ()=,<>!\r\n]+ ;

fragment
DIGIT : [0-9] ;
fragment
ESC : '\\"' | '\\\\' ; 

WS : [ \t\r\n]+ -> skip ;

Going by top down approach:

  • We can see than in my case, my input is a statement.
  • A statement comprises of an expression part and a command part.
  • Expression has multiple patterns – it can be two expressions connected by an expression operator.
  • Expression can be internally two expression without an explicit operator between them.
  • An expression can be predicate – A predicate is of the patter <text> <operator> <text>
  • An expression can be just a text. Eg: We just want to do full text search on “LOGIN”.
  • An expression can be an expression inside brackets for grouping.
  • A command has a command starting with a pipe, then a command like “show” followed by arguments.

Creating the Lexer, Parser and Listener

With ANTLR, once you come up with the grammar, you are close to done! ANTLR generates the lexer, parser and listener code for us. Lexer helps with breaking our input into tokens. We usually don’t deal with the Lexer. What we will use is the Parser – The Parser can give us a parsed expression tree like shown below.

Parsed Tree

ANTLR also gives you a tree walker than can traverse the tress and gives you a base listener with methods that get called when the traverser is navigating the tree. All I had to implement the translator was to extend the listener and overwrite the methods for the nodes I am interested in and use a stack push the translations at each node. And that’s all, my robust translator was ready pretty fast. I am not going to post about ANTLR setup and running guide here, because that’s quite clear in their documentation. But feel free to reach out to me incase of an clarifications!